§ How-To
Auto-Feed Trimmer Head Not Advancing Line — Troubleshooting Guide
Frequent forum question: bump head clicks but no line comes out, spool jammed, spring broken
Published · Last updated:
If your auto-feed or bump-feed trimmer head clicks when you tap it but no fresh line comes out, you’re dealing with one of the most common string-trimmer problems homeowners run into. This question comes up often in owner forums, and the usual complaints are all the same: the head bumps but won’t advance, the spool feels jammed, or the spring inside seems broken or missing tension. The good news is that most feed problems come down to a few simple causes—incorrect line size, line wound the wrong way, fused line on the spool, or a worn bump-feed head. With a little inspection, you can usually get the trimmer feeding correctly again without replacing the whole machine.
How an Auto-Feed or Bump-Feed Head Is Supposed to Work
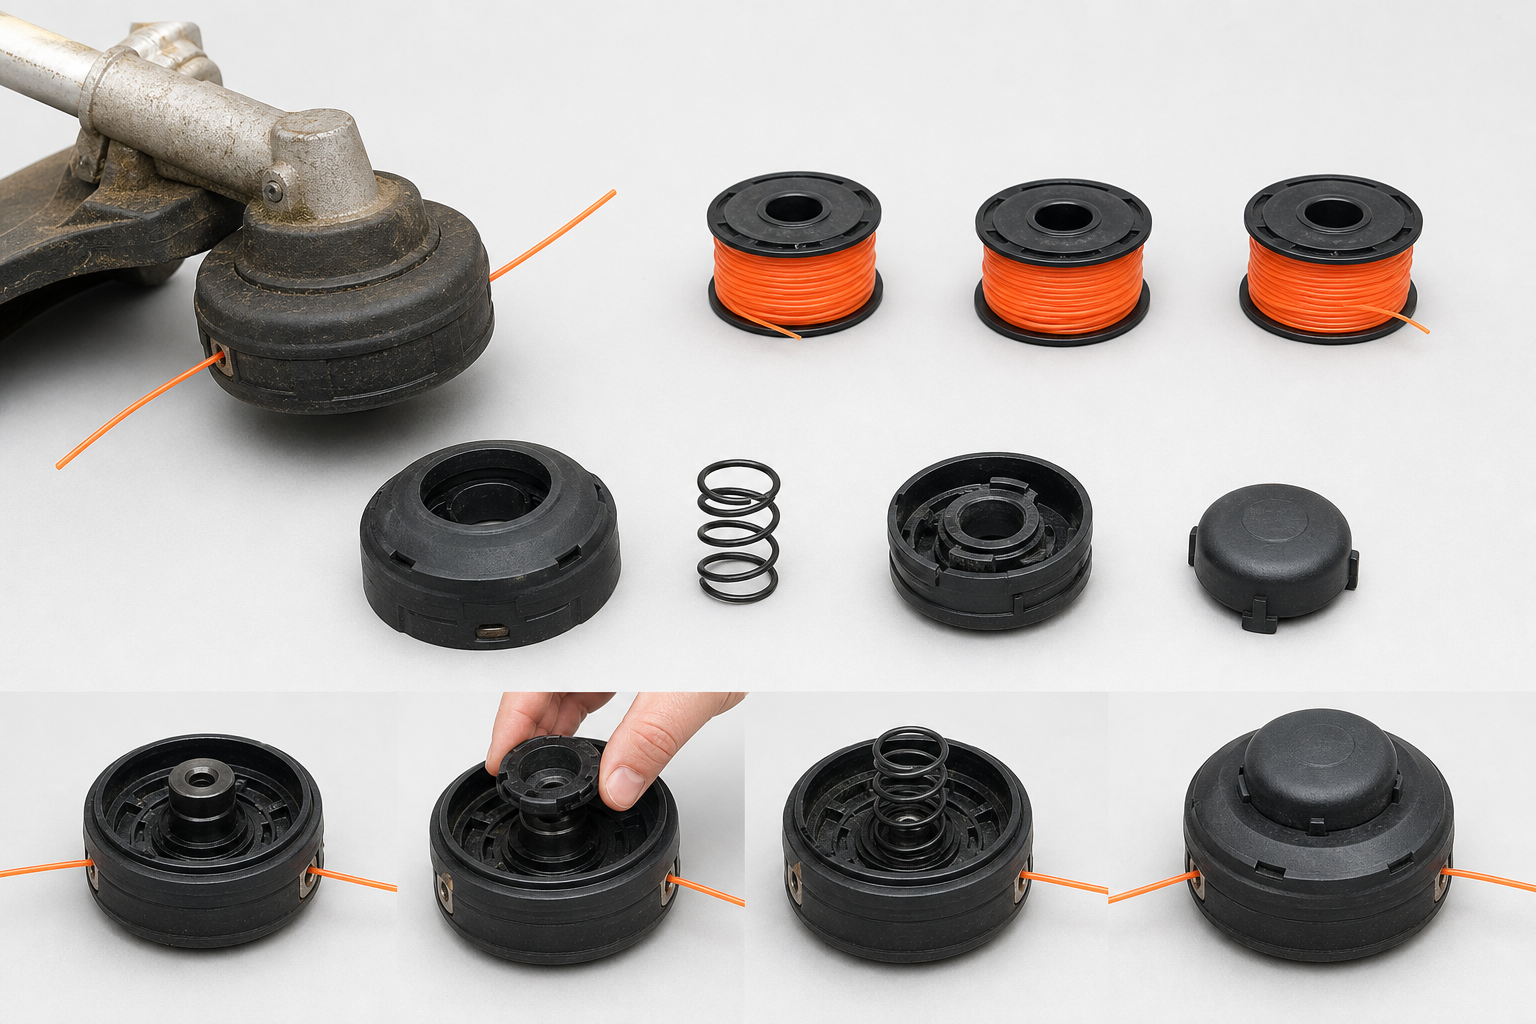
Before troubleshooting, it helps to understand what’s happening inside the head. On most homeowner string trimmers, the spool holds replacement trimmer line under light spring pressure. When you bump the head on the ground at operating speed, the mechanism briefly releases the spool so a small amount of line can feed out. The cutter blade on the debris shield then trims the line to the correct length.
If the head clicks but line does not advance, one of three things is usually happening:
- The line cannot move freely on the spool
- The spool is not unlocking when bumped
- The internal parts are worn, broken, or assembled incorrectly
A true “broken spring” problem does happen, but not as often as people think. More commonly, the spring is installed crooked, packed with debris, or the spool tabs and eyelets are too worn to let the line move.
Start by shutting off the unit, disconnecting the spark plug on gas trimmers or removing the battery on cordless models, and then taking the head apart on a clean bench or tailgate where small parts won’t get lost.
Check for the Most Common Cause: Wrong Line or Bad Spooling
The number one issue I see is line-related. If the replacement trimmer line is too thick, too stiff, wound too tightly, or loaded in the wrong direction, the head may click but the line will never feed properly.
Here’s what to inspect:
- Line diameter: Use only the size recommended by the manufacturer. A head designed for .080” line may bind badly with .095” line.
- Line type: Some aggressive, serrated, square, or heavy commercial line profiles do not feed as smoothly in small residential heads.
- Winding direction: Most spools have arrows showing which way to wind. If wound backward, the bump mechanism may tighten the line instead of releasing it.
- Overfilled spool: Too much line packed onto the spool prevents free movement.
- Crossed or buried wraps: If line overlaps unevenly, it can dig into lower layers and lock itself in place.
- Melted or fused line: Heat from friction or storage in a hot shed can cause coils to stick together.
A properly loaded spool should unwind with steady resistance, not jerk, bind, or stick. Pull both tag ends by hand. If they don’t move smoothly, rewind the spool.
Best practice for respooling
Cut a manageable length of replacement trimmer line and wind it neatly, layer by layer, under moderate tension. Don’t cinch it down hard. Keep each wrap parallel. If your spool has split chambers, load each side evenly. Leave just enough tail length to thread through the eyelets and retain the ends in the loading notches until reassembly.
If the line looks brittle, chalky, or kinked, replace it. Old line becomes less flexible and feeds poorly. For DIY homeowners, fresh, quality trimmer line often solves what seems like a major head failure.
Inspect the Spool, Eyelets, and Spring for Jams or Wear
If the line is loaded correctly and still won’t advance, look closely at the spool and the head housing. Dirt, grass sap, and wear inside the head can stop the mechanism from moving.
Check these parts carefully:
- Spool center bore: It should rotate and slide freely on the center post
- Eyelets or exit holes: These guide the line out of the head. If they’re grooved, sharp, or packed with debris, the line can hang up
- Retaining tabs: Worn spool tabs can let the spool sit crooked or fail to release correctly
- Spring: It should not be collapsed, rusted away, broken in two, or installed off-center
- Bump knob: Cracks or rounded engagement surfaces can prevent proper release
- Inner head housing: Remove packed grass, hardened dirt, and melted plastic fragments
A spring problem usually shows up as a spool that feels loose, doesn’t return properly, or won’t stay seated during assembly. If the spring has snapped or lost tension from heat, replace it. Springs are inexpensive compared with a complete head, but only if the surrounding plastic parts are still in good shape.
Also inspect for heat damage. If the spool or housing shows glazing, melted edges, or plastic dust, the line has likely been dragging badly inside the head. In that case, replacing only the line may not be enough—the spool itself may already be distorted.
A quick wear test
With the head disassembled, install the empty spool and spring without line. Press and rotate the spool by hand. It should move smoothly and return positively. If it sticks, cocks sideways, or feels sloppy, the spool or bump-feed head is worn and should be replaced.
Reassemble the Head Correctly and Test Line Feed
A surprising number of no-feed complaints are caused by simple reassembly mistakes. Even experienced owners sometimes route the line incorrectly or miss the spring seat.
When putting the head back together:
- Seat the spring fully in its pocket
- Install the spool in the correct orientation
- Thread both line ends cleanly through the eyelets
- Release the line ends from the spool notches after the cap is secured
- Make sure the cap snaps or threads fully into place
Once assembled, pull each line end gently. You should feel the spool move slightly and the line should extend with some resistance. If one side moves and the other does not, the line is crossed internally or one chamber was wound incorrectly.
Then test the head under normal operation. Run the trimmer up to speed before bumping the head lightly on firm ground. Don’t slam it. A soft tap is enough on a properly working bump-feed head. Repeated hard impacts often damage the knob, cap, and spool tabs.
If the line still does not feed, stop and inspect again rather than forcing it. Forcing a stuck head usually turns a minor spool problem into a broken housing.
When to Replace the Spool, Line, or the Entire Bump-Feed Head
There’s a point where troubleshooting stops being worth the time. If the head has been repeatedly jammed, run hot, or used with the wrong replacement trimmer line, the internal parts may be too worn to trust.
Replace the line only if:
- The spool and head are in good condition
- The old line is brittle, fused, or the wrong diameter
- Feed problems started right after a refill
Replace the spool if:
- The winding channels are distorted
- The center hole is egg-shaped
- The line retainer notches are broken
- The spool binds even when empty
Replace the spring if:
- It is broken, collapsed, heavily rusted, or missing
- The spool no longer returns properly after bumping
Replace the complete bump-feed head if:
- The cap won’t stay attached
- The bump knob is worn through or cracked
- The housing eyelets are badly grooved
- The internal locking features are rounded off
- Multiple internal parts are worn at the same time
For many homeowners, replacing the complete bump-feed head is the most practical repair once the original unit is badly worn. It restores feed performance and usually costs less than the time spent chasing intermittent jams.
Prevent Future Feed Problems
Most trimmer-head issues are preventable with a few habits:
- Use the exact line diameter the trimmer calls for
- Don’t overfill the spool
- Rewind line neatly and in the correct direction
- Clean the head regularly after heavy trimming
- Store replacement trimmer line sealed or in a cool area so it doesn’t dry out
- Replace worn spools before they damage the head housing
- Avoid running the head directly into fences, concrete, and rocks
One more pro tip: if line is drying out and becoming brittle, soaking it in water for a day can sometimes restore flexibility enough for smoother feeding. That won’t fix a damaged spool, but it can help with stubborn line on homeowner-grade trimmers.
Watch: Video Walkthrough
FAQ
Why does my bump head click but no line comes out?
Usually the line is jammed on the spool, wound incorrectly, overfilled, or the spool/spring is worn. The clicking tells you the mechanism is trying to release, but the line itself is not moving freely.
Can I use thicker replacement trimmer line to make it last longer?
Not unless your trimmer head is rated for it. Thicker line often causes feed problems in homeowner trimmer spools and can overload the bump-feed head.
How do I know if I need a new spool or a whole new head?
If only the line channels or spool center are worn, a new spool may fix it. If the cap, bump knob, eyelets, and locking parts are also worn, replace the complete bump-feed head.

Find the right part on Amazon
Check price, stock and fitment — ships direct from Amazon.
§ Parts


