§ How-To
How to Wind a Trimmer Spool Without Tangling
Users complain: line tangles after 2 minutes, cross-wound, spool keeps jamming
Published · Last updated:
If your string trimmer line tangles, binds, or quits feeding after just a couple of minutes, the problem usually starts at the spool. This question comes up often in owner forums: the line looks neatly wound at first, but once the head spins up, it cross-winds, digs into itself, and jams the bump-feed head. The good news is that most of these problems are caused by a few repeat mistakes—wrong line size, loose winding, overfilling, or winding in the wrong direction. If you learn the correct way to load trimmer spools, you can get smooth feeding, less downtime, and better cutting performance from your string trimmer.
Start With the Right Line and the Right Spool
Before winding anything, confirm that your replacement trimmer line matches what the trimmer head was designed to use. Many jamming complaints come from forcing oversized line into a spool that was meant for a smaller diameter.
Check the owner’s manual or markings on the spool cap for the correct line size. Common residential sizes are:
- .065” for light trimming
- .080” for most homeowner use
- .095” for heavier grass and weeds
If the line is too thick, it may not sit properly in the spool channels. If it is too thin, it can overlap, bury itself, and feed inconsistently.
Also inspect the spool itself. Replace it if you see:
- Cracked divider walls
- Melted plastic
- Deep grooves worn into the spool edges
- Bent or damaged retaining tabs
A damaged spool will never wind correctly for long. The same goes for a worn bump-feed head. If the head internals are rough or the spring and cap are damaged, even perfectly wound line may jam.
A few setup tips that prevent problems right away:
- Use fresh trimmer line, not brittle old stock
- Cut equal lengths if using a dual-line spool
- Avoid mixing different line shapes or diameters on one spool
- Clean debris from the spool housing before reassembly
If the line has been stored in a hot shed for years and feels stiff, it tends to spring out of place while winding. Fresh, flexible replacement trimmer line is much easier to load neatly.
Wind in the Correct Direction and Keep Tension Consistent
The most common cause of cross-wound line is winding against the arrow marked on the spool. Most trimmer spools have a directional arrow molded into the plastic. Follow that arrow exactly. Winding backward often leads to poor feeding and immediate tangling.
Once you’ve identified the direction, focus on keeping steady tension. Loose wraps are the enemy. They let the line jump over itself and dig down into lower layers during use.
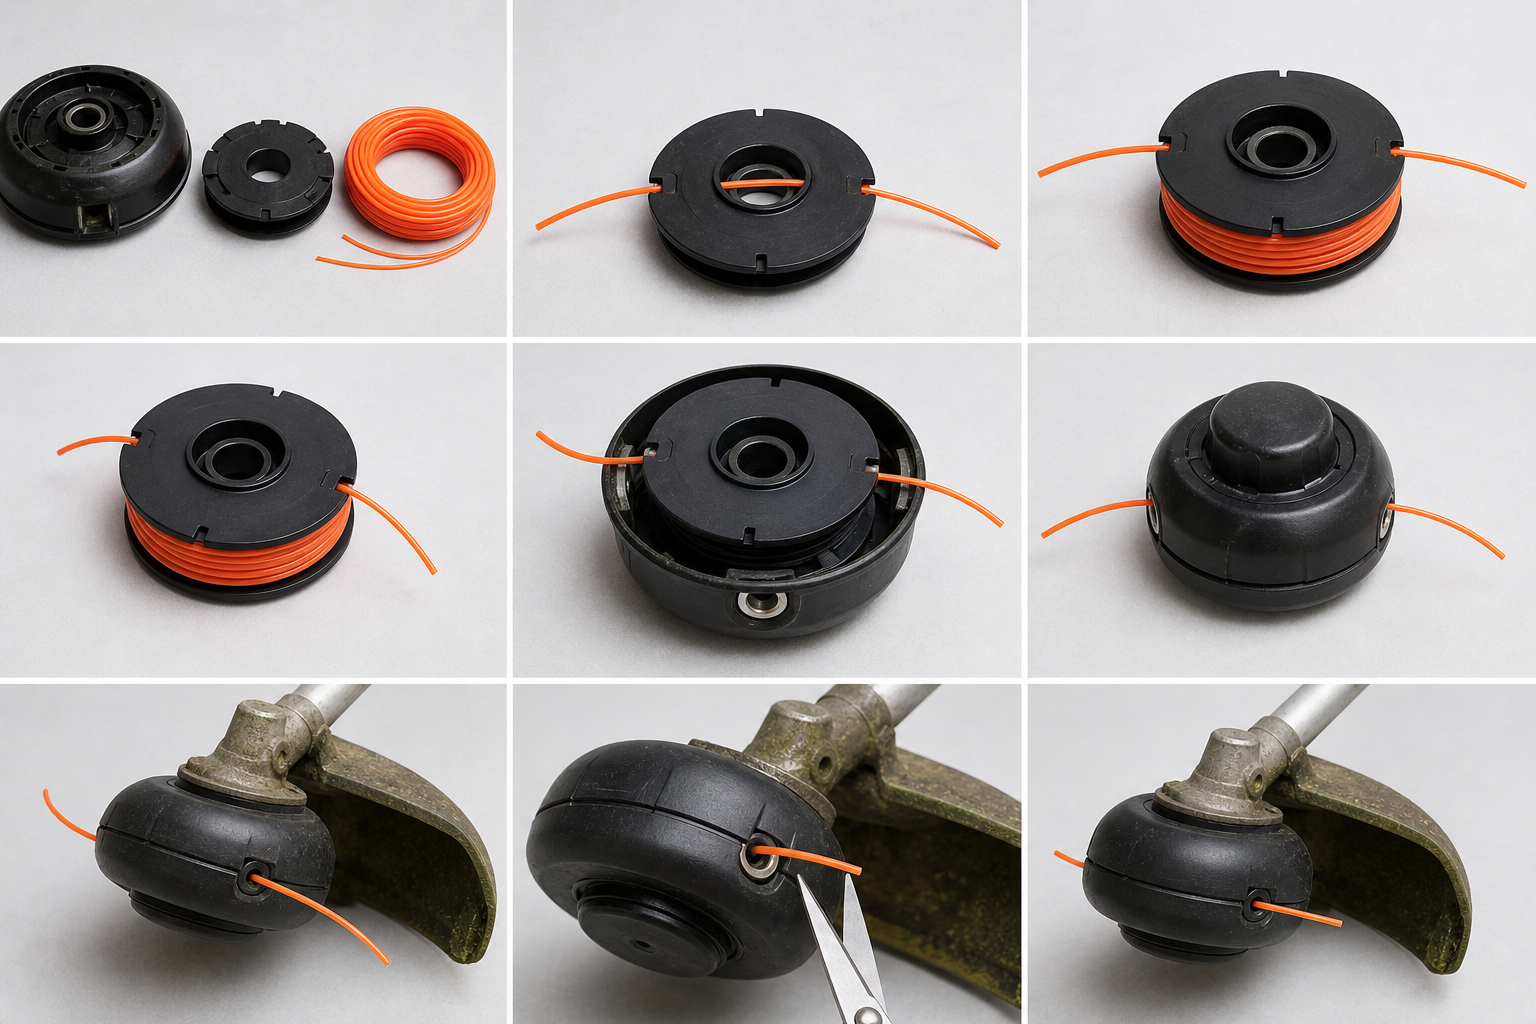
Here’s the basic process:
- Remove the spool from the bump-feed head.
- Clean off packed grass and dirt.
- Locate the anchor hole or retaining slot in the spool.
- Insert the end of the line securely.
- Wind in the direction of the arrow.
- Keep each wrap snug and side-by-side.
- Do not let loops cross over one another.
Think of it like winding extension cord on a reel: neat, even layers matter. If one loop climbs over another, stop and fix it immediately. That crossed loop is usually where the jam starts.
For dual-line trimmer spools, each chamber must be wound separately and evenly. If one side is wound sloppily or has much more line than the other, the spool can feed unevenly or bind under load.
A practical shop tip: hold the line between your thumb and forefinger while rotating the spool with your other hand. That gives you better tension control than trying to wrap line around a stationary spool by hand.
Don’t Overfill the Spool
Another issue that comes up often in owner forums is overfilling. Homeowners understandably want to load as much line as possible so they do not have to stop and rewind. Unfortunately, a packed spool is much more likely to jam.
Most trimmer spools have a fill line, capacity marking, or enough visual cue to show when the line should stop just below the rim. If the line bulges above the spool edges, it is overfilled.
An overfilled spool causes several problems:
- The line pinches under the cap
- Wraps press into each other too tightly
- The spool cannot rotate freely in the head
- The line won’t release properly during bump feed
As a rule, leave a little space at the top of the spool. The line should sit neatly within the spool flanges, not mushroom out above them.
If your trimmer uses pre-cut lengths rather than bulk winding, stick to the manufacturer’s recommended length. Guessing long usually backfires.
When the spool is full, secure the loose ends in the spool notches if equipped. Those holding notches keep the line from unraveling while you reinstall the spool into the bump-feed head.
Reinstall the Spool Correctly to Prevent Immediate Jams
Even a well-wound spool can tangle if it’s installed incorrectly. Once the spool is loaded, thread the line ends through the eyelets in the trimmer head housing before seating the spool.
While reassembling, check these parts:
- Eyelets for wear or sharp edges
- Bump knob for cracks
- Spring for proper seating
- Cap tabs for damage
- Head cavity for packed debris
Worn eyelets are easy to overlook, but they matter. If the line drags through a burred or heat-damaged eyelet, feeding becomes erratic and the line may snap or stall.
After assembly, pull each line end gently to make sure it moves freely. Then spin the head by hand. It should rotate smoothly without scraping or binding.
Before going back to full trimming, do a quick function check:
- Start the trimmer
- Run at moderate speed
- Bump the head lightly on the ground
- Verify the line advances evenly
If it still jams immediately, take it back apart and inspect for one of these missed issues:
- Line wound backward
- Crossed wraps in one chamber
- Wrong diameter line
- Too much line on the spool
- Debris trapped under the spool
In many cases, the root cause is not the winding technique alone but a worn bump-feed head that no longer releases line cleanly. If you have repeated trouble despite careful winding, replacing the spool, cap, or complete head assembly is often the smarter repair.
Tips to Make Trimmer Line Last Longer and Feed Better
Once you know how to load trimmer spools properly, a few habits will help keep them working.
First, avoid slamming the bump-feed head hard on pavement or compacted gravel. A light tap is enough on most units. Hard impacts can damage the spool, cap, or feed mechanism.
Second, use the trimmer line for the kind of work it was meant to do. Light round line used in heavy brush will wear fast and create more heat in the head. Excess heat can soften the line and contribute to sticking.
Third, inspect line condition regularly. Replace line if it is:
- Frayed
- Fused together
- Flattened from heat
- Brittle and breaking off in short pieces
Some homeowners also have better results if they soak nylon replacement trimmer line in water for a day before use, especially in very dry climates. It can improve flexibility and reduce breakage, though proper winding is still the main factor in preventing tangles.
Finally, if your spool repeatedly binds no matter what you do, consider switching to a quality replacement spool or complete bump-feed head designed for your exact model. A fresh set of parts often solves chronic feeding issues faster than fighting worn components.
Watch: Video Walkthrough
FAQ
Why does my trimmer line tangle after only a few minutes?
Usually because the spool was wound too loosely, wound in the wrong direction, cross-wound, or overfilled. Wrong-size replacement trimmer line and worn bump-feed head parts can also cause fast jamming.
How tight should trimmer line be when winding a spool?
It should be snug and even, with each wrap lying neatly beside the previous one. Tight enough to stay in place, but not so tight that it deforms the line or becomes difficult to feed.
Can I use thicker line to make it last longer?
Only if your string trimmer head is rated for that diameter. Using line that is too thick for the spool or bump-feed head often causes poor feeding, extra strain, and frequent jams.

Find the right part on Amazon
Check price, stock and fitment — ships direct from Amazon.
§ Parts


